


Make A Macrame Dog Collar
Make A Macrame Dog Collar!
By Lara Torrey
In this tutorial, you will learn how to make a dog collar using macrame techniques. All it takes is some rope, hardware, and a few simple knots! This is a great beginners project, whether you're making it for your pet or as a gift for a dog lover.
Macrame is a therapeutic hobby that is fun, durable and aesthetically pleasing. It's easy to learn and the possibilities are endless!
Let's learn how to create a unique, handmade macrame collar for your best furry friend! I'll go over the steps to create a square knot macrame dog collar that is suitable for a medium to large breed dog.
Gather Your Materials
- 2x 3ply 5mm Cotton Rope
- 1” side release buckle
- 3/4” D ring
- Scissors (these are my favorite)
- Tape
As an Amazon Associate we earn from qualifying purchases. Thank you for checking out our recommendations!

Shop Macramama


$40.00
$36.00
Step 1: Prepare Your Rope

For this tutorial, I will be making an 18” dog collar, suitable for a medium/large dog.
You will need to cut 2x ropes of your 5mm 3ply cotton rope that are each 120” in length. You will also cut a 3rd rope that will be 15” in length. This 15” rope will be set aside to use in the last step of the project.
Next, you will take your 2x 120” ropes, getting one end of each rope together. You will need to insert these ends through one side of the buckle. You will pull these ends, at the same time so that you have 25” of rope pulled through the buckle, these will be called your filler ropes. The longer ends of rope will be placed to either side of your filler ropes and these will be called your working ropes. Your working ropes will be approximately 95” in length.
Step 2: Secure the buckle
Tape your buckle down to a flat surface, like a desk or table. Be sure to use tape that won't damage the surface if it's painted! Masking tape, painters tape, or washi tape should work great.
Step 3: The square knot


Time to start knotting! The first thing you will want to do is separate your ropes. You will have your two filler ropes straight down the middle and your working ropes to the left and right of the filler ropes.
In this collar tutorial, I am using the square knot. The square knot is a two-step knot.
The first step is to take your left working rope, place it horizontally over your filler ropes. Then place your right working rope directly on top of the left working rope. This formation of ropes resembles a number 4.

To tie the knot, the right working rope will need to pass behind the filler ropes and through the space created on the left side. Pull your left and right working ropes out and away from the filler ropes to tighten the knot.
Now for step two of the square knot. We are going to do the same thing but in reverse. You will now take your right working rope and place it horizontally across the filler ropes. The left working rope will be placed on top of the right working rope. This rope formation resembles a P. To tie the knot, the left working rope will need to pass behind the filler ropes and through the space created on the right side. Pull your left and right working ropes out and away from the filler ropes to tighten the knot.
Step 4: Add the D-Ring
After adding 2 square knots below the buckle, it is time to add your D ring. Pull the 2 filler ropes through your D ring so that the D ring is up against the square knots below the buckle.

After adding 2 square knots below the buckle, it is time to add your D ring. Pull the 2 filler ropes through your D ring so that the D ring is up against the square knots below the buckle.
Step 5: Create The Collar
Continue knotting and alternating between “4” and “P” knots for the balance of your dog collar.
You will continue your square knots until you have reached 18” in length. In this step, you can also fit to your dog, maybe add a few more knots or a few less, depending on their neck size. 18” for my Daisy girl is a good length.


Step 6: Add The Second Buckle
Untie the knots from each rope end. Add the other end of your buckle to the buckle side that is currently attached to your ropes.
Step 7: Loop Through The Second Buckle

While both ends of the buckle are attached, pull all 4 ends (filler and working ropes) through the top of the buckle and create a 3” space between the buckle and last square knot.
Step 8: Secure The Second Buckle
Separate the buckle ends and tape the new buckle side down to a flat surface. Secure the buckle with a 1x square knot.

Step 9: Pull Rope Ends To The Front
Gather all rope ends together at the front of the 3” space. Your working ropes are likely much longer than your filler ropes. Although the steps are the same, everyone pulls their knots differently, so I gave some added length on these working ropes to ensure you would not run out of rope.

Step 10: The Wrapping Knot
We are now going to fill in the 3” space with a wrapping knot with the shorter 15” rope from step 1. To tie a wrapping knot, first place the short 15” rope at the center of your collar with a 1” tail going straight up above the buckle.
Next, take the end of the rope and bring it over and around, to create a loop, this loop should resemble a lower case d.


Now you are going to take the balance of that rope and wrap it around all ropes in the 3’ space, while working down. While wrapping the ropes, you should be including the loop, and wrapping the rope as securely as possible. You will fill in the 3” space with your wrapped rope.
Once you have wrapped the rope to fill in the 3” space, take the end of your rope and pull it down through your loop.
Last, you will gently pull up on the top 1” tail to pull the loop up through your wrap to secure the wrapping knot.
Cut off the top rope once you have pulled the loop up into the wrapping knot.


Step 11: Finishing Off The Rope
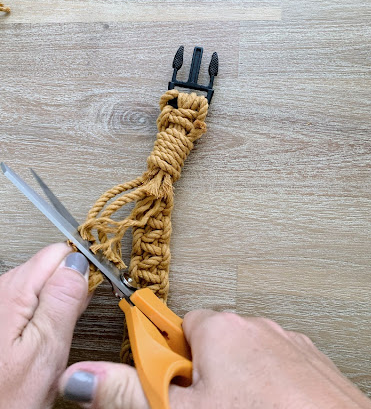
You will likely have some leftover ropes at the bottom of your wrapping knot. Option 1 - trim the ropes to be 2” in length and unravel for a cute fringe detail Option 2 - trim the ropes flush with the wrapping knot


And you're finished!
Grab your favorite furry friend and gift them with their new handmade collar!
They'll be the fanciest boho pooch at the dog park.
We love all things macrame and fiber arts at Jenny Lemons! Want to learn more?
Check out our selection of macrame supplies and kits and sign up for an upcoming workshop!
Have you tried this tutorial? Share your projects in our comments!

MACRAMAMA
Lara Torrey is the owner and creator behind Macramama. She purchased a vintage macramé book from the 60’s a little over 12 years ago and has been hooked ever since! She is a wife, mother to 3 boys, full time grad student and macramé artist. She loves creating, sharing and teaching the therapeutic art of macramé to all ages.

Comments
DeAnna Anderson-Shannon said:
Thank you for providing a tutorial that broke down the steps with clear and detailed pictures. It was super helpful and the pictures made it easy to check where I was in the process. You rock!